DLTK's Bible Crafts for Kids
Creation Mobile
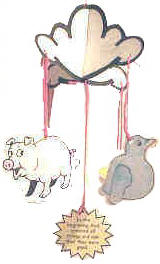
Description of finished craft: The center of the mobile says, "In the beginning God created all things and saw that they were good." The mobile hangs from a 4 sided cloud. The mobile pieces are a star, a fish, a pig (animal) and a bird.
Materials:
- glue (I like to use a glue stick for this type of project as it dries fast and wrinkles the paper less, but regular white glue works too),
- scissors,
- printer,
- paper,
- wool or string,
- thin cardboard (old cereal box) and
- something to color with.
OPTIONAL DECORATIONS:
- feathers,
- gold sparkle glue,
- cotton balls
- unused coffee grounds
There are enough pieces to this project that a group of children could make it together (5 children could each make one of the hanging pieces of the mobile and 2 children could make the cloud). That way Sunday School classes can complete the mobile for their church in one sitting. If you choose to do this as a group, it's nice to use all of the optional decorations so that each child's piece is extra special.
Instructions:
- Print Template 1 (the fish).
- Color (as appropriate) -- water color paint works nice as does finger paint
- If you color some of the details (like the fins) with crayon and then paint over the whole thing with water color paints, it turns out very pretty.
- Fold the template in half so the pieces line up nicely.
- Unfold the template and apply glue to the inside (the uncolored side).
- Refold the template
- Cut out the template piece. You don't have to cut right on the dotted line... just cut somewhere between the dotted line and the fish... This makes it easy for beginning scissor users to manage.
- Print Template 2 (the star).
- Color (as appropriate)
- OPTIONAL: Gold sparkle glue or gel pen works nicely to outline the edges of the star
- Fold the template in half so the pieces line up nicely.
- Unfold the template and apply glue to the inside (the uncolored side).
- Refold the template and let dry
- Cut out the template piece. You don't have to cut right on the dotted line... just cut somewhere between the dotted line and the star... This makes it easy for beginning scissor users to manage.
- Print Template 3 (the pig).
- Color (as appropriate)
- OPTIONAL: Put a couple of "puddles" of glue near the pig's feet and perhaps a little on his back. Sprinkle with coffee grounds (mud).
- Fold the template in half so the pieces line up nicely.
- Unfold the template and apply glue to the inside (the uncolored side).
- Refold the template and let dry
- Cut out the template piece. You don't have to cut right on the dotted line... just cut somewhere between the dotted line and the pig... this makes it easy for beginning scissor users to manage.
- Print Template 4 (the bird).
- Color (as appropriate)
- OPTIONAL: Glue a feather onto each wing.
- Fold the template in half so the pieces line up nicely.
- Unfold the template and apply glue to the inside (the uncolored side).
- Refold the template and let dry
- Cut out the template piece. You don't have to cut right on the dotted line... just cut somewhere between the dotted line and the bird... This makes it easy for beginning scissor users to manage.
- Print Template 5 (the center message sunburst).
- Color (as appropriate)
- OPTIONAL: Gold sparkle glue or gel pen works nicely to outline the edges of the sunburst.
- Fold the template in half so the pieces line up nicely.
- Unfold the template and apply glue to the inside (the uncolored side).
- Refold the template and let dry
- Cut out the template piece. You don't have to cut right on the dotted line... just cut somewhere between the dotted line and the sunburst... This makes it easy for beginning scissor users to manage.
- Print Template 6 (the clouds).
- Glue the template to a piece of thin cardboard.
- Glue a plain piece of white paper to the other side of the cardboard
- Cut out the template.
- Cut up the center dotted line
- Punch holes where indicated (one in each corner and one in the middle) -- 5 holes altogether.
- OPTIONAL: glue cotton balls all over the cloud.
- REPEAT for TEMPLATE 7
- Cut down the middle line of template 6 and up the middle line of template 7 if you haven't already. Slide the pieces together.
- Tie an equal length piece of string to each of the first four template pieces and tie them onto the 4 corners of the cloud
- Tie a longer piece of string to the sunburst message and tie it to the center of the cloud.
- Tie one last piece of string to the top of the cloud and hang from the ceiling!
Templates:
- Close the template window after printing to return to this screen.
- Set page margins to zero if you have trouble fitting the template on one page (FILE, PAGE SETUP or FILE, PRINTER SETUP in most browsers).
Template 1 (the fish) (color) or (B&W)
Template 2 (the star) (color) or (B&W)
Template 3 (the pig) (color) or (B&W)
Template 4 (the bird) (color) or (B&W)
Template 5 (message) (color) or (B&W)
Template 6 (the cloud) (B&W)
Template 7 (the other cloud) (B&W)
Printable version of this story