DLTK's Bible Crafts for Kids
 Paper Bead Cross Necklace
Contributed by
Well, if you haven't figured out yet that I don't like spending money on craft supplies, you're about to.
Tasha wanted to make a bead cross, but I thought it would be so much more fun (er, cheap) if we made our own beads. I used to do this in girl guides when I was young but hadn't done it with the girls yet. This seemed like the perfect project for it!
Tasha's very proud of her necklace and wears it (even to school... shhh, don't tell the powers that be *grin*). She even had some of the other girls ask about how it was made.
Materials:
- scrap paper: here are some ideas
- we used the paper that flower bouquets get wrapped in (yes, I keep everything),
- used gift wrap
- magazine pages (glossy ones with lots of pictures and little writing.
- even construction paper will work!
- something long and round to wrap the beads around: -- younger children
will need something fatter (so the beads have a big hole) and older
children can use something as thin as a toothpick. Here are some ideas
- a pen or pencil
- a bamboo skewer
- a toothpick
- a knitting needle
- a straw
-
 glue (we used a glue stick, but regular white glue works too)
 - scissors
- OPTIONAL: clear (or fairly light) nailpolish
- string, wool or ribbon (it has to fit through the hole in the beads so must be thinner than the long and round base you've chosen)
Instructions - Making Paper Beads:
- To start, you'll need to make some beads for the cross.
- Make 3 one-inch beads and 1 two-inch bead.
- don't get too fussy... just have the kids make a bunch of beads and then pick out the ones that make a nice cross.
- any leftover beads can be threaded onto the necklace part of the cross necklace (sort of like a rosary) or can be used for a different necklace
- Cut out long triangles from the scrap paper.
- They should be at least 11 inches long (standard paper size), but can be bigger.
- They should be as wide as you want the bead (so a one inch bead would have a one inch edge).
- We just estimated ours and cut them out freehand, but if your children are at the age where they are practicing ruler use, have them measure it out!
-
 we used a skewer as our base... you can use a straw, knitting
needle, etc. I'll use the word skewer through the remainder of these
directions to mean whatever base you've chosen.
we used a skewer as our base... you can use a straw, knitting
needle, etc. I'll use the word skewer through the remainder of these
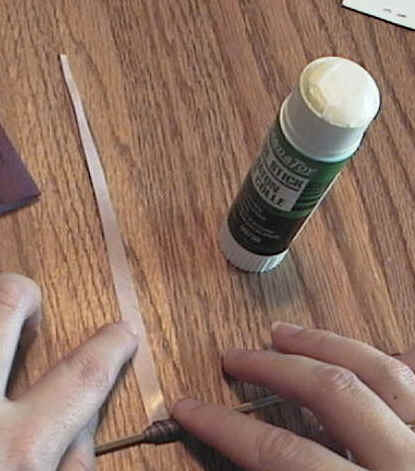
directions to mean whatever base you've chosen. - apply glue to the back side of the triangle (don't apply glue to the beginning 1/2 inch or so or else your bead will end up glued to the skewer and you won't be able to pull it off
- starting at the wide end, wrap the triangle around the skewer all the way to the point. The triangular shape of the paper will give you a tapered bead. If you use a long enough piece, your bead will be almost round.
-
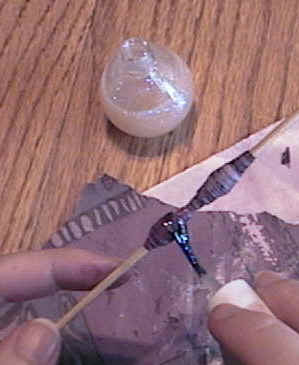 OPTIONAL: apply a coat of clear (light) nail polish. Although this
is optional, it does make the beads shinier and a bit more sturdy.
OPTIONAL: apply a coat of clear (light) nail polish. Although this
is optional, it does make the beads shinier and a bit more sturdy. -
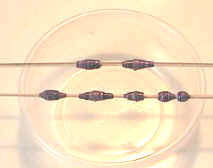 Set your skewers over a bowl or glass (so the beads are suspended in
the air) to dry.
Set your skewers over a bowl or glass (so the beads are suspended in
the air) to dry.
 Instructions - Assembling the necklace:
- Although you can thread the cross with one piece of string or wool (like regular bead buddy projects), I prefer to do it the way I have in the instructions below with paper beads as they aren't quite as uniform as your regular pony beads would be.
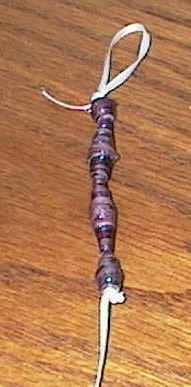
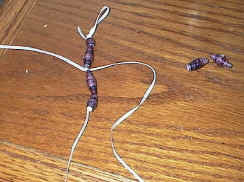
- Take one piece of string and thread on a one inch bead and a two
inch bead.
- We made our beads a bit too short so we added a tiny bead to the top and a tiny one to the bottom. Be flexible!
- You can arrange your beads on the table in the shape of a cross before you start threading them together so you know what ones you want to use
- Tie a knot in one end so the bead doesn't slip through
- Tie a loop in the other end to hang on a necklace.
-
 tie a second short string in the center of the first (between the 1
inch and 2 inch bead)
tie a second short string in the center of the first (between the 1
inch and 2 inch bead) - thread a bead on each side and make a knot so they don't fall off.
-
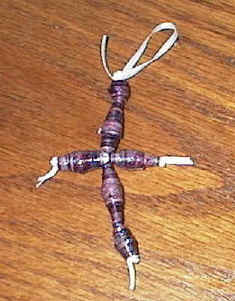 you'll end up with a cross.
 - take a long string (long enough to put over the child's head and thread the cross onto it.
- You can thread small toothpicks (breaking off the excess) on each side to keep the cross from flopping (or just use sturdy lace that holds its shape better than the ribbon we used)
- you can add beads to the necklace itself if you want.
Printable version of these instructions